POTATO!
Hello, Ben here. Well, there's a new addition to the SEED garden. But first, a lilting rhyme about our subterranean nightshade:
Potato potato potato,
is in the family of tomato.
But although it is round
and grows in deep ground,
the potato is not a tomato.
Yeah! Well recently I put in a raised potato bed. Potatoes grow underground and like deep deep soil to grow their tasty taters. Now, traditional farmers will just raise a shitload of soil. This works, but the drawbacks are that you have to disturb the soil a hell of a lot to plant them, and then rip it up again to harvest the potatoes. Tough on the plants and the soil. Not that I totally did this exact thing next to the house.
Right.
Ha, not me. My totally not stolen idea (not totally stolen from neighbor Will McCraken) is to create only about 6 inches of good soil, and then stack on lots of easy much material like straw, leaf cuttings, and paper shreds from Oberlin bureaucracy HQ down the street. A circle of chicken wire lets me stack this cheap soil up 3-4 feet! Now, the potatoes can grow up through feet after feet of loose mulch, and just lay those potato babies all the way up. As the new potatoes poke through, I just add more mulch. More mulch equals more potatoes!
The benefits are that now to harvest, I simply have to shift aside the straw/grass/paper/etc and pick the potaties without killing the plant. It's like picking a tomato from the vine.
Step by Step:
1: choose a 5-8 foot diameter circle of land somewhere that gets full to mostly full sun ( plus yum yum sun points).
2: layer down cardboard. This kills grass and weeds underground leaving no problems subduing those pesky natives (minus 5,000 post-colonial sensitivity points).
3: set in some posts along the perimeter of the circle, and then wrap chicken wire around the posts (easier said then done, minus 10 minutes).
4: add 6 inches of soil. (plus 6 inches of soil points).
5: plant potatoes (maybe 1.5 feet apart? Plus 20 agricultural experimentation points).
6: stack up loose mulchy stuff (plus 10 creativity points for organic matter).
7: water em in.
There it is, a raised potato bed, in 7 steps.
-Ben
Friday, July 10, 2009
Monday, April 27, 2009
Creating a Three-Bin Compost System from Pallets!
A few weekends ago at one of our workdays, we created both a rain water filter (to be discussed in a future post) and a three-bin compost system, which I will be writing about here!
THE MAKING OF THE COMPOST BINS
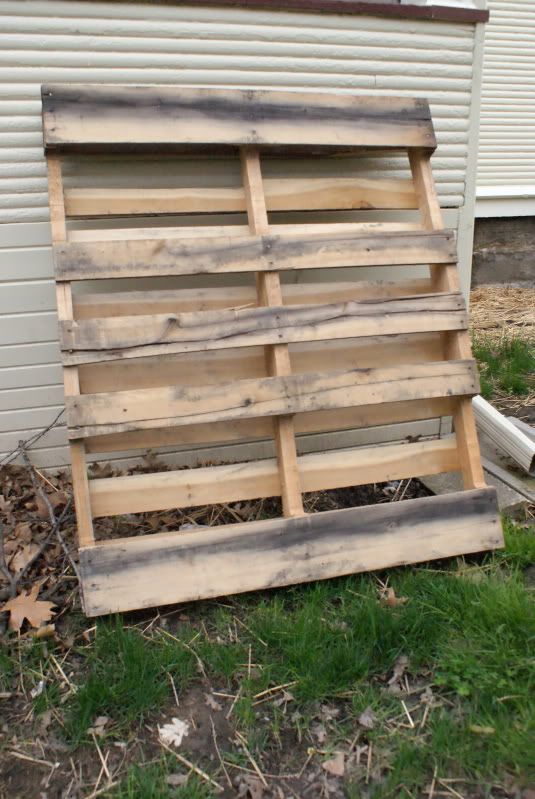
First, we obtained pallets, like this:

We got ours from Oberlin College Facilities but if you can't do that, used pallets are probably available for free or very cheap if you ask around at garden centers, farms, etc. We then put them together in this basic design:

which follows the idea that the raw materials to be composted (food scraps, yard waste, shredded paper, what have you) goes into bin (1) and once (1) is full, the contents are flipped into bin (2). Once (2) is full, it is flipped into bin (3) and (1) is again flipped into (2). By the time you get to the third "flipping," the compost in (3) will theoretically be ready to use. For more information, visit this site. For other compost bin designs and construction instructions, try this link.
To start out, we placed the pallets like so:

and attached the pallets on the ends together with wire hangers. We left the pallets separating (1) from (2) and (2) from (3) unattached, so they can be slid in and out to facilitate flipping of the contents of one bin into the next. We also added some boards across the bottom of each bin because of the gaps in the pallets.
There are various techniques that can be used to speed up and ameliorate the process of composting using this system. Good airflow is key, because it helps the chemical reaction proceed faster. It also helps to flip the compost over every once in a while, once again to allow oxygen to flow through the compost. What you put in also affects how fast your compost breaks down and how good the product is. An ideal ratio is about 30 parts carbon to one part nitrogen. You can find information on carbon and nitrogen sources, plus lots of other good general composting tips, at this website. For more information on the chemistry behind composting, try here.
A three bin compost system makes sense because it's inexpensive, easy to construct (provided you have a few laborers prepared to lug some pallets around), composts relatively quickly, and can hold a large amount of compost. If you have space, consider constructing one. Composting is cool, guys!
THE MAKING OF THE COMPOST BINS
First, we obtained pallets, like this:
We got ours from Oberlin College Facilities but if you can't do that, used pallets are probably available for free or very cheap if you ask around at garden centers, farms, etc. We then put them together in this basic design:

which follows the idea that the raw materials to be composted (food scraps, yard waste, shredded paper, what have you) goes into bin (1) and once (1) is full, the contents are flipped into bin (2). Once (2) is full, it is flipped into bin (3) and (1) is again flipped into (2). By the time you get to the third "flipping," the compost in (3) will theoretically be ready to use. For more information, visit this site. For other compost bin designs and construction instructions, try this link.
To start out, we placed the pallets like so:

and attached the pallets on the ends together with wire hangers. We left the pallets separating (1) from (2) and (2) from (3) unattached, so they can be slid in and out to facilitate flipping of the contents of one bin into the next. We also added some boards across the bottom of each bin because of the gaps in the pallets.
There are various techniques that can be used to speed up and ameliorate the process of composting using this system. Good airflow is key, because it helps the chemical reaction proceed faster. It also helps to flip the compost over every once in a while, once again to allow oxygen to flow through the compost. What you put in also affects how fast your compost breaks down and how good the product is. An ideal ratio is about 30 parts carbon to one part nitrogen. You can find information on carbon and nitrogen sources, plus lots of other good general composting tips, at this website. For more information on the chemistry behind composting, try here.
A three bin compost system makes sense because it's inexpensive, easy to construct (provided you have a few laborers prepared to lug some pallets around), composts relatively quickly, and can hold a large amount of compost. If you have space, consider constructing one. Composting is cool, guys!
Thursday, April 9, 2009
Workday #2 and Lasagna Beds!
On Saturday, April 4 SEED Permaculture held a second workday. We continued building up beds and transplanted seedlings.


The method of bed-building we are doing at SEED is called "Lasagna Gardening." It's a no-till method that builds on top of mediocre soil, instead of attempting to move and improve the soil.
So how do you make lasagna beds? Easy!
1. Lay down some wet cardboard or three layers of newspaper on top of the soil.
2. Pile on compost, soil, shredded leaves, veggie scraps. Some gardeners recommend alternating between fresh "green" and older "brown" compost layers, but we just piled on some rich soil mixed with still decomposing compost.

(A lasagna bed)
Some bonuses of making lasagna beds:
Dea


The method of bed-building we are doing at SEED is called "Lasagna Gardening." It's a no-till method that builds on top of mediocre soil, instead of attempting to move and improve the soil.
So how do you make lasagna beds? Easy!
1. Lay down some wet cardboard or three layers of newspaper on top of the soil.
2. Pile on compost, soil, shredded leaves, veggie scraps. Some gardeners recommend alternating between fresh "green" and older "brown" compost layers, but we just piled on some rich soil mixed with still decomposing compost.

(A lasagna bed)
Some bonuses of making lasagna beds:
- Newspaper, cardboard and mulch all suppress weeds.
- Better water retention.
- Less need for commercial fertilizer because the soil is already compost rich.
- The soil is soft and easy to work!
Dea
Monday, March 16, 2009
Spring Starts: Seeding and Swales on Sunday

Sunday morning was beautiful and golden! I woke up early (at least for students) and hustled downstairs to the kitchen where I found my housemate Isabelle and friends Ben and Dea preparing a hearty breakfast. More friends, students and community members soon joined us and we sipped our tea and ate our scrambled eggs and tofu, pancakes (endless amounts of them), and potatoes.
Glenn Gall, who, with Isabelle, helped lead a Practicum in Permaculture Design during our January Term, demonstrated how to use two different kinds of levels to measure the contours of the land so know how best to dig swales and build raised beds. Swales, he and Isabelle explained, are ditches used to redistribute water and prevent erosion in a permaculture-designed garden. They are a foundational first step in building a healthy infrastructure for a food forest/garden.

After this demonstration, we got to work. Some people worked to dig the actual swales, others started to loosen and aerate the soil of the lawns with pitchforks, while others sat in the sun of the porch starting seeds. After aerating the soil we spread a layer of composted leaves donated to us by the college grounds manager Dennis Grieve. On top of this we spread unfolded cardboard boxes and topped all this with compost and straw. We used wood chips to make paths so we could be sure to minimize walking on the beds which compacts the soil.

Lots of students, SEED house members, and community members generously donated time and labor to help us build beds as well as did folks from BioTour (www.biotour.org), visiting Oberlin for the weekend.


The day was filled with friends, food, compost, worms, and luckily sun. It was wonderful to see our first garden event go so well. Dea G., one of the students who worked on the design for the garden over Winter Term, expressed her excitement to see the paper turn into a real landscape. I empathize with her. Not only is the plan fast becoming a physical reality but it is happening as a result of a wonderful union of hands.
Keep your eyes and ears sharp for events to follow soon and follow this blog to watch our progress. Even better walk by the house (20/22 E. Lorain).
With Gardening Love,
Kate Coury

Subscribe to:
Comments (Atom)